Showing posts with label Recipe. Show all posts

Tuesday, September 25, 2012

For the love of Rojak Kucei™


If you like something to quench the palate with fresh crunchy vege (cucumber, jicama and mung bean sprouts) that meets a savory, almost spicy, filling and long lasting meal from protein source of boiled eggs & fried chicken with fried chives fritter, thick slices of fried tofu and a helpful serving of flavorful, fiber-loaded gravy poured over them, then this is the DISH.

Have it for breakfast, lunch or dinner, there is no rule of when you can have them.

In my book, like Subs sandwiches in US, it is all about the bread; in Italy, its all about the sauce for their pasta dishes. The filling goes secondary. Malaysia and Singapore has their own set of ingredients that makes the dish for their endless lists of fabulous food. For Noodles, its all about the gravy. Gravy, Gravy, Gravy.

But one, very particular dish is the Indian Rojak or some call it Rojak Mamak, both famous in Malaysia and Singapore.  Rojak means 'a mix ' and in this entry, it's a vegetable and protein mix dish with THE gravy that actually makes this DISH. Without this Gravy, it's just like any regular Salad.

A local gal I will always be, will bring you to very popular place in Kuching, located at Batu Lintang Hawker Centre (Jalan Batu Lintang), Kuching, Sarawak, Malaysia is Rojak Kucei (pronounced Koo-Chay). A place so famous for the Indian Rojak that foodies literally compare all Indian Rojak to Rojak Kucei™ in Kuching. It has become a trademark. A must-go-to place. You need to be fast, as they will never make another batch for the rest of the day.

My reason of adding this entry is, one: my sister with her SOS and two: last July, I saw a friend's post on a social network, Mr Mozz Moss, you know you're at fault :) and my crave of Rojak Kucei were unimaginable that I actually dreamt of having it the night after. The only way to suppress this was to make some. I have never made this dish, ever. No worries. A girl has to do what a girl is craving for :) Search the Web and Cook.

My 'best friend,' the internet, is there to serve and save me. Searching for 'Indian Rojak' or 'Rojak India' as keywords.


My search got refined to these two links. Singapore Indian Rojak and Rojak (ala melayu) - Cucur Udang - Kuah Rojak - Rojak India to start. I was imagining the main ingredients that makes a Rojak India and for my case, Rojak Kucei™ of Kuching. Comparing notes with both sites, I went with the first link for the gravy

The Gravy

450g sweet potatoes
5 cups water
4 tbsp oil
1 ½ tbsp tamarind juice in water (more or less to taste)
100g sugar Salt to taste
6 shallots, pounded finely
3 cloves garlic
2 tbsp chilli paste
1 tsp Chicken stock
100g toasted peanuts, pounded
1 tsp salt
A little dark soya sauce (for colour) * I opt this out

**I added these ingredients below realizing something is missing in the ingredients above

• 1 stalk of lemongrass, crushed
• half an inch of Galangga, (frozen for easy grating) about a teaspoon grated 
• Added about half a teaspoon of chilli flakes to add more spice
  1. Boil the sweet potatoes then blend in separate portions with half amount of water. 
  2. Heat oil in a saucepan and fry ground shallots and garlic, chilli paste and chicken stock. 
  3. Add in blended sweet potatoes and remaining water. Cook for 3 to 4 minutes.
  4. Add tamarind juice, palm sugar and salt to taste. 
  5. • Add in the lemongrass, galangga and chilli flakes
  6. Stir continuously over a gentle heat for 2 to 3 minutes or until sauce is thick. 
  7. Add peanuts [ and a little dark soy sauce for color.]

and the second link for the 'Cucur' or Fritter. I opt to only have the Chives as part of the ingredient and omitting the prawn which was called for in the ingredient.

Chives Fritter
the ingredients may not be much but creates a ton of flavor.

100 g All Purpose Flour
20 g of Rice Flour
** 20 g of Cornflour ( this adds an extra crunch for my batter and soft on the inside)
** 1/2 tsp baking powder
1 egg
1 green Chilli (pepper) - get rid of the seeds and sliced or chopped
1 red Chilli (pepper) - get rid of the seeds and sliced or chopped
15 stalks of Chives  (I used more of these as I like them)
Water
Salt to taste
Oil for Deep frying

1. Mix three types of flours, baking powder and salt

2. Add in eggs, green and red chilli, chives and water and mix well to a soft not to runny nor too solid of a batter.

3. heat up Oil for deep frying. Drop a tablespoonful at a time and fry till golden brown. Take out of the hot oil and cut into halves or quarters when cool.

Tips from the 2nd link chef: For the fritter dough, the eggs soften the batter, it must not be too hard nor too runny so that the fritter is soft. As a general tip, use one egg for every 300 gms of flour. Let the batter rest for 15-20 minutes before frying.

Fried Chicken

1 (1kg/2 lbs) whole Chicken or Chicken breast (cut according to how big or small you'd like them)
1 tablespoon or more of Turmeric
1 teaspoon of Salt
1 teaspoon of Crushed Black Pepper
Oil for deep frying (or use ones after frying the fritter)

Marinate the Chicken well with Turmeric, salt and crushed black pepper.
Fry Chicken till cooked and drained on rack.

Other 'must-haves' ingredients to make the Rojak complete.
  • 200g Bean Sprouts (clean out the root tips, if you like and blanch for a 30 seconds to a minute and put in ice water to stop from cooking further, drain) 
  • 200 gms of Jicama (peeled and julienne)
  •  1 medium size cucumber (julienne or in half inch cubes) 
  • 3 (3x3x1) tofu squares (deep fried and cut into 8 pieces each) 
  • 4 boiled eggs (peeled and cut into halves or quarters)

To Serve

Put all the ingredients in a plate: Chicken, Chives Fritter, Eggs, Cucumber, Tofu, Jicama & Bean Spouts (Romaine lettuce, if any, as in picture) Pour gravy over them. Serve Warm or Cold to your liking. I always like mine warm.

Enjoy! :)


And to my sister who has the SOS out in Kiwiland, here's the recipe to the rescue. Please adjust to your liking :)

To All out there, I thank you for visiting and happy cooking :)

Friday, November 11, 2011

11.11.11 Elevating my mind & creativity through my senses


A wonderful morning I had even though it was 36ºF/2ºC out today, but I brave myself for another day of bike ride to work. Such lovely day should not be wasted. Not an eventful day, but it was a good one.

Kampua Mee at Rafie Cafe, Sibu. Delicious! :)
Last August, I had a blast, traveled back to my roots for  4Fs ~ family, friends, food and fun! :) I still miss my family and the food, after a couple of months back into reality, work and daily routine. Recently, I tried recreating what I still crave, The Kampua Mee of Sibu. My first taste of Kampua Mee was at Rafie Cafe in Sibu, Sarawak, during one of the most spontaneous and best trip I had -- driving from Kuching, Sarawak to Kota Kinabalu, Sabah, with my sister and her 2 girlfriends. Simply delicious. With just little ingredients, the noodle satisfies all your taste buds. Since then, I have been craving for more. Too bad, we were in Sibu for only a few hours, stopping by for lunch and Durian.

Now, back in my own kitchen, I tried to recreate the Kampua Mee through my taste buds memory. Below is what I would think some of the ingredients would be, but with a twist as I am being my own cook.

Kampua Mee Style Noodle How-to.
My version of 'Kampua Mee' Style Noodle.
Ingredients
5-6 shallots
3-4 ( i like it a lot)  cloves of garlic
half a teaspoon dried chili flakes
3 tablespoon olive oil
half a cup of raw Shrimp (cut to smaller pieces, as I find that it flavors better in cut into small pieces.)
a cup of cut Gailan (optional)
a cup of sliced carrots (optional)
1 packet ( 1lb) of Hongkong style noodle ( pre cooked noodle)
2 tablespoon of light soy sauce.
Salt and pepper to taste.

my 'Kampua Mee' style noodle.
Heat up oil on medium, add onion and let oil infused the onion for about 5-10 minutes, Add garlic, do the same. Let the onion and garlic in the oil for about another 10 minutes, keeping the heat on medium till the onion and garlic gets caramelized. Add in half a teaspoon of chili flakes. less if you like it less spicy. I like mine a bit with heat. I added Gailan & Carrots for my recipe. You can omit this if you like. Mix well for about 5 minutes, then add in the Noodle. Add in salt and pepper to taste. Mix the ingredients well for about 10- 15 minutes, making sure the noodles are well blended well with flavors of the oil.

Cooking takes less then 30 minutes for this dish. I hope you'll try them and you will like this simple but flavorful dish.

Monday, March 7, 2011

Masala Vadai aka Cucur Rodei

Masala Vadai, or Cucur Rodei  we call it back home. One of my favorite savory snack food. My mom knows me too well and always reminded me in case I ever forget:)  She knows I always look forward to my favorite Cucur Rodei from this one Indian lady at her small spot in Kuching Sunday Market, buying a bag full to bring home to family, with extra eaten with freshly squeezed sugarcane juice on my way home. Heaven! I can eat these for breakfast, lunch and dinner. Her Cucur Rodei is perfectly cooked, crunchy on the outside and soft on the inside.

Thank you Auntie, for the best Cucur Rodei in Kuching! Nothing beats this.


Recently with my crazy cravings for food from home, I cannot just go out and get one like I used to. I have to make some myself and I had tried making these before, perfecting the recipe each time through taste bud memory and with the help of the world wide web. What I thought all those while, that the lady's famous masala vadai has dried shrimp, I was so wrong. The flavorful taste of it tricked me, and I did a few trial and error till this came out. This is one full vegetarian snack that you would love, entirely.

For my friend Rosalind, here's my simple recipe for my Masala Vadai.

Main ingredients

Masala Vadai ~
by FreezerNinja
Ingredients
1 lb of Chana Dhal ( soaked 4-6 hours or overnight)
One medium Onion
1-2 fresh Chillie ( or you can also use dry chillies, ground, some people like it cut in pieces or 1 teaspoon of chillie flakes) ~ heat of chillies to each one's taste bud
2 tablespoon of chopped Parsley (optional * I love the flavor of parsley in my mix)
2 tablespoon of chopped Cilantro
2 tablespoon of chopped Curry leaves ( fresh or dry)
1 teaspoon of Coriander powder ( you can use Coriander seeds and grind them coarsely instead of powder, I love these to create more texture)
1 teaspoon of Cumin ( ground or whole)
1 teaspoon of salt ( to taste)
Oil for frying

Process

1. Grind Chana Dhal coarsely, not fine.
2. Grind Onion with Chillie, Parsley, Cilantro and Curry leaves together.
3. Add ingredient 2 into 1. Add Salt to taste, Cumin & Coriander to the mixture.
4. Make into balls and flattened into patties.
5. Heat enough oil for frying.
6. Drop each of the patties gently into the hot oil.
7. Fry about 4-6 mins, flip them once you've seen the sides get golden brown but make sure not to disturb them before this happens or else will break  and get it crumbly in the oil if its not cooked & adhere to each bean.
8. Deep fry till golden brown.
9. Take it out of the fryer, on a rack to get access oil out or on a paper towel.

Crunchy on the outside, medium soft on the inside. Yummmm!

yummmm!
I hope you would love these as much as I do. Its a flavorful & fiberful snack. Vegetarian all the way!:)

Note: I did try baking them, instead of frying, I put them on a baking sheet, drizzle olive oil and bake them till it is golden brown. I find that it gets a bit too dry, but not so bad. I still prefer it fried. Double yumm!:)

Enjoy, All:)

Monday, February 21, 2011

From Red Turtle to Red Velvet

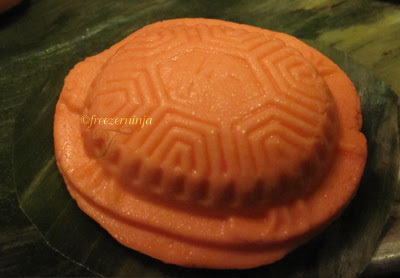
ang ku kueh sans mold
my very first Ang Ku Kueh made, sans mold
Once very young, I always look forward to my Mom's question, 'Do you want to go out to the 'Pasar'* with me?" My eyes would say, 'Yes!' before my voice came out! At this age, I am thinking selfishly that I am my mother's only child. ~I am in my own world, but I love you no less dearest sisters and I am thankful to have all of you & will never ever trade you for any luxuries in this world. :)

These are times I treasure most, I would create a mental album of images around me. I was only half the height of my own petite beautiful mother. Everything is big. One image among many caught my attention ~ A stall near the bus station with arrays of delicacies, desserts. One particular Chinese dessert. The most beautiful, in my mind ~ Red, delicate with beautiful pattern embossed, oval shaped dessert placed nicely on an oval cut banana leaf. That time, I must feel like I have eyes of a goldfish ~ goggling, snapping, capturing all those beautiful colors. I would just stared quietly, never dare to ask if I can have some, only if my mom offers to.

Years may have passed, it still sticks with me ~ that bright red kueh* at the stall. Till one day, at school, a friend gave me a bite. What a delicious treat! Where can I have one, more? That was my very first Ang Ku Kueh. Such delicate skin with not too sweet of a filling, fills my brain with happiness. Oh, so good!

That seems eons ago and recently, craving for one. I cannot get one here and have never made one either. I searched for recipes and found a few. One from MyKitchenSnippets, caught my most attention. Comparing ingredients with what is available to me here. No mold, I thought. No steamer, I will improvise. No problem. The taste is key and the color of course. Why the color? Ang is Red in Chinese and Ku is Turtle. Hence its name, Ang Ku Kueh. Red Turtle Dessert.

Only after my first time making this, I know now why it is different from most Malay dessert. The filling and the ingredient in its skin. Two key and very healthy ingredient. Mung Bean and Sweet Potatoes. They are fiber loaded.

Ang Ku Kueh Recipe

filling
1 cup of mung bean
2 tbsp canola oil
3/4 cup of sugar

skin
2 cups of glutinous rice flour
1 tbsp sugar
1/2 cup mashed sweet potatoes
1/2 cup hot water
a few drops of red food coloring

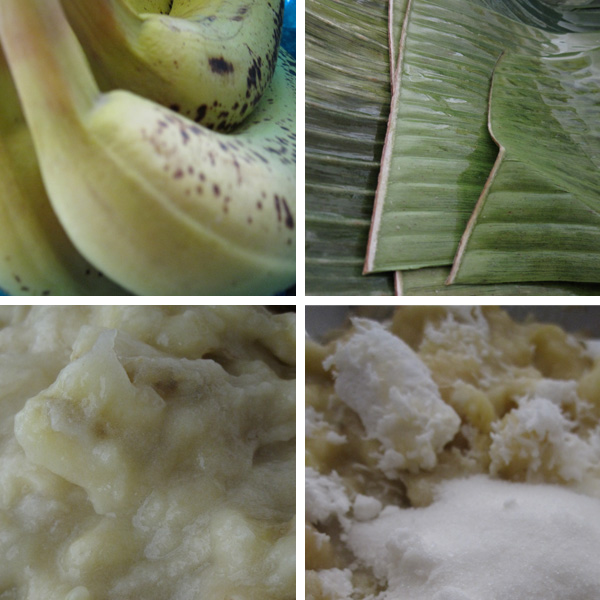
ang ku kueh how to
Ingredients with step by step images

1. Soak mung bean overnight and steam till soft.
2. Steam Sweet potatoes till cooked.
3. Add the steamed mung bean while its still warm with canola oil and sugar into a blender. Blend till smooth.
4. In a bowl, mix glutinous rice flour, sugar, mashed sweet potatoes, add in hot water and mix into a dough.
5. Add in a few drops of red food coloring, and knead into the dough.
6. Get the steamer ready, here I am using a wok with a rack and layered with banana leaves.
7. Make the filling into balls.
8. Divide the dough into 16 balls. Flatten dough, put the filling in the center and start pinching, closing the dough to form a ball.

red and orange ang ku kueh
Before & After. Red & Orange Ku.
9. Rubbing a little bit of oil on each, then put them on the banana leaf in the steamer. Steam for 8 minutes.
10. Cool and serve. Yumm.

I made a batch without the red coloring and had the natural sweet potatoes orange color for the skin.

cross section ang ku kueh
Chomp! to give you the cross section:)
cross section ang ku kueh
Orange Ku - naturally colored with sweet potatoes as one of the ingredients

Enjoy!

* Pasar ~ Market; kueh ~ sweet dessert in Malay

Added March 6th, 2011.

ang ku mold
Ang Ku mold . Thanks Julia!:)
I got this yesterday in my mail from a friend, Julia Lim:) Thanks so much Julia.

before steam Ang Ku
my first trial, a bit too big for the mold.
Ang Ku Kueh
the finish product, Ang Ku Kueh. The way I first saw it


-------------------------------------------------

From my love for Red Turtle Dessert to my fascination of Red Velvet Cake.

Red Velvet Cupcake
Red Velvet Cupcake
The famous southern dessert which made me stare at the TV every time a chef makes them. May it be on a throwdown, or a regular food show, I am glued to the screen.

Finally, I had an urge to make it last Christmas for gifts. I found out how easy it is to make this. The recipe search started, comparing each one that I have seen and at last, I found three that I like very much and used this recipe.

From cupcake to the ice cream cone.
I am on a Red Velvet cupcake baking mode!:) I made a regular cupcake and the other putting them in an ice cream cone. Kudos to those who came up with this brilliant idea:) perfect for a little kid's party cake.
Red Velvet process

These are images from my trials in my magic kitchen. My therapeutic space.

Red Velvet in Ice Cream Cone

I hope you will try and enjoy them as much as I did. Click this recipe. Happy Baking!:)

Saturday, July 17, 2010

Bananarama II: Steamed Banana dessert - Pais Pisang/Lepat Pisang

pais pisang aka lepat pisang

Bananas for banana I am as you may have seen from my previous entry, 'BananaRama- I run for bananas!' During these past few weeks, the bananas I have bought have been ripened at a speedy rate, I cannot even keep a perfect ripe one longer than 2 days even though I bought them while they are still green! the temperature has been so high lately. Those oh so ripe bananas do not go to waste in my kitchen. Made them into fried banana dumpling (picture at bottom of page) and just now, steamed banana dessert that is wrapped in banana leaves. This brought me back to my Mom's kitchen.

Mmm..still steaming as I took that picture. For my friend, Haniz:) here's the very simple step you can follow.

Ingredients:

Banana leaves for wrapping ( cleaned and cut them into 6 inches wide, making sure to handle them ever so gently, as the leaf tears easily )

8-9 large ripe banana
1/2 cup of shredded Coconut (optional)*
1/4 cup sugar ( optional especially when the bananas are so ripe. it is sweet on its own)
pinch of salt
2 cups of All Purpose Flour (or more if you like it firmer)
[an option of replacing 1 cup of AP flour with 1 cup of Whole Wheat Flour]

* this ingredient reminds me of a lady whom we waited every morning at our college dormitory for my favorite version, lepat with coconut center.


Mix them altogether.


On one leaf, scoop about 3 tablespoon of the mixture, fold part of leaf as shown, then fold the other half to cover. Finally, fold the ends and tuck them at each end, like shown.

Get your steamer ready. As you can see, I am using a wok with a rack placed halfway with water enough for steaming. Make sure you have the water boiling and ready to steam. Put the ready wrapped banana mixture onto the rack. Cover and steam for about 15-20 minutes till it is firm to touch.

Makes about 18-20.


Voila! you have yourself, wrapped steamed banana for dessert. Enjoy!

Ah, I should not forget my all time favorite. Cekodok pisang. Fried Banana Dumpling. Cucur Jompot in my language.

'cekodok or jemput pisang' in Malay, more like a banana fried dumpling [cekodok - looks more like a toad, hence the name, a dark frog curling its body; jemput pisang is little drops of banana. ]

cekodok pisang; fried banana dumpling

Monday, March 8, 2010

Coconut Chocolate Marble Tea Cake

I was working on some designs and my head was not where it was supposed to be. I kept thinking of what I have in my pantry and how much eggs in the fridge. It's baking, again. Remember the Coconut Tea Cake that I had here? I have been playing and tweaking the recipe. This time, I lessen the sugar and oil and added 3 more ingredients. Cocoa, Vanilla & Water which was absent in the first one. So here goes,

baked and sliced
Coconut Chocolate Marble Tea Cake
- by yours  truly:) first made successfully on March 8th, 2010.
Rich & moist without too much guilt, I think:) eat at yr own risk:)


Heat your oven to 325ºF

Plain Batter:

Ingredient 1A:
2 eggs
1/2 can coconut milk ( 200 gm)
1/2 cups sugar ** ( see notes below)
1/4 cup canola oil ** ( see notes below)

Ingredient 1b:
1 1/2 cups of flour
2 tsp of baking powder

Ingredient 1c:
1/4 tsp vanilla
1 tblspn of water

Chocolate Batter:
Ingredient 2a:
2 eggs
1/2 can coconut milk (200 gm)
1/2 cups sugar
1/4 cup canola oil

Ingredient 2b:
1 1/4 cups of flour
1/4 cup of cocoa
2 tsp of baking powder

Ingredient 2c:
1/4 tsp vanilla
2 tblspn of water (**I find that cocoa seems to produce a bit of a dry cake so adding this would help)

Get ready two separate bowls,  one for the plain batter and the other for the chocolate. Both ingredients are pretty much the same. The only difference is the Cocoa, for chocolate batter.

Mix ingredient A well till nice and smooth but not over mixing in each bowl. Then, add in Ingredient B, then C.

before and after
Making the Marble.

Pour the plain batter one layer, and pour the chocolate batter next and repeat. It will spread flat so don't worry if it looks a bit messy.
I am using 2 loaf pans but you can use 8x8 pan.
Pour in a greased and floured or lined with parchment/grease proof paper.

Bake in 325ºF for about 1 hr or till skewer comes clean.

**NOTE: I have reduced the sugar from the original recipe from  a total of 2 cups to 1 cup. I prefer it less sweet and with the cocoa being 1 cup, it will taste more like dark chocolate. Feel free to add sugar if you like. The same goes to the Canola Oil. Reduced from 1 to half cup. I found it is still moist because of the coconut milk.

*Conversion:
1 all-purpose flour - Cup US = 125 gram - g
1 cup oil = 8 fluid ounces( fl oz)

Happy Baking, Bakers!:) these are really good with plain unsweetened hot tea or coffee.

Tuesday, February 2, 2010

Chicken with Tomatoes. Recipe by Ramona Ariffin

My tummy was rumbling and I was out of ideas of what to make for dinner today. I suddenly remembered the recipe given to me by a dear friend from back home while chatting. Here's to you Ramona, I have made this today and it is superb! Simple yet so tasty! My kind of recipe:) Thank you.

This recipe is given to Ramona by her sister-in-law. Just by its little and fresh ingredients, I know I have to try it! You can try them too and tell us what you think of it.

Chicken with Tomatoes. Recipe given by Ramona Ariffin.
Ingredients
Half a chicken ( cut to small pieces)
1lb or half a kilo of tomato, diced or thinly sliced
Sliced red/green Chilie peppers - to your own heat level
1 large Red Onion OR 3 to 4 small yellow onions
2-3 tablespoon of Oil [I prefer olive, for sauteing]
Salt to taste

Saute onions till caramelized, add in the diced or thinly sliced tomatoes. Once tomatoes are softened and well mixed, add in chicken, salt to taste.


Notes:
**~to add more flavor to the the dish, Cloves, Anise Seed, Cinnamon can be added while sauteing the onion. Add fresh ground pepper towards the end.
**~ if you like it to have curry taste to it, then you can add Curry powder to the ingredient

Recipe was passed to Ramona by her Sister-in-law.

Thanks Ramona, for sharing!!:)


I tested it today and it came out amazing! Just as I thought it would. Image seen here is from sauteed Onions, caramelized, add Cinnamon, Star Anise, Cardamom, Cloves & a quarter of teaspoon of Chili flakes (replacing fresh sliced chili.) Add sliced Carrots, then diced Tomatoes. Once tomatoes have softened, add in Chicken, simmer till chicken is cooked and tender. Salt and freshly cracked Pepper to taste. Serve. Enjoy!:)

Another friend, Musdi, posted his picture (above) of what he had made from the same recipe. We'll see how many will be trying this recipe.

Sunday, October 18, 2009

Tart Nenas : Pineapple Tart

I was craving again last night, for my all time favorite, the Pineapple Tart. A very good friend, Sherry, sent me a tray together with chocolate chips cookies, all the way from home and I cannot get enough of it! Bless your heart & Thank you Sherry!
tart nenas, pineapple tart
These are a must have, almost in every household during religious festivals back home, in Malaysia. May it be Chinese New Year, the Eid and other religious holidays or festivals, you will find them. It is delicious almost crumbly yet buttery on the outside; sweet, tart and almost chewy in its filling. Super delicious! Like Rugelach as my all time favorite in the States, these are the Ultimate Cookie back home, well next to Kuih Makmur [Mexican wedding cake in States] of course.

So, I went to my computer for recipe search and its among the top listed searches for 'Tart Nenas.' Of course everyone have their favorite ones. I got a few. After so many days of searching for the best ingredients, I came out with my own which came from a combination of so many recipes. I want my crust to be buttery, not too crumbly yet with a little crunch, enough to hold the pineapple jam that I made. This will be my 3rd recipe that I dare to come up with, according to what my taste bud likes.  I am making this tart without any rolling pin but just roll and press them with my fingers to make it into its shape. It may not be as pretty, like what I have seen online, but I think I got the taste to be just perfect. Just the way my FreezerNinja taste bud likes:) I would say, it taste like having thick almost chewy fruit jam on a shortbread. Something like that. Oh, and the cloves, made a world of difference in taste, that is if you like cloves:)

I first made them on Oct 14th with successful alteration last night, Oct 17th, 2009. So here goes, my avid reader.

Pineapple Tart.
~by FreezerNinja.

Pineapple Jam
1 Large Pineapple (ripe)
1/2 cup of sugar
1/2 tsp of salt
6 cloves
1 cinnamon stick
2 tablespoon of cornflour

Peel, get rid of the core and grate or put them in your food processor.
Put the grated pineapple into a pot with sugar, salt, cloves and cinnamon and mixing them well, bring them to boil. Cook them till it gets thick, no more juice and add in the cornflour. Mix well, simmer and let it cook till further thickens, making sure to stir them from time to time.  This process took me about half an hour or so. I divided this to 4. The Tart dough below uses only a quarter of this Jam recipe.

Tart dough (makes 25 tart or cookie
)

4 oz of butter
2 tbsp confectioners sugar
1 egg
1 pinch of salt
3 tbsp cornflour
1 1/2 cup of all purpose flour

Beat butter till creamy.
Add in confectioners sugar and salt.  Mix well.
Add in egg. Mix well.
Add in flour and cornflour.

Mix well till the dough forms into a ball and do not stick to the bowl.

Heat your oven to 350ºF
. My recipe will use only a quarter of the jam that has been produced from one large pineapple. So you know what to do if you want to finish the jam:)

Divide the dough into 25 small portions.
Roll them in an oval shape, about 1/8" thick.
Put about 1/2 of a teaspoon pineapple jam in the middle of the dough and roll.
Put them about and inch apart on a parchment paper lined baking tray.

NOTE: If you like to add egg wash on the tart, this is the time to do it, just beat 1 egg and brush them before you put them into the oven.

Some of the tart/cookie, I stick one clove in, just because I love the taste of clove in my pineapple tart. I have a bit of a weird taste buds. This is optional.

Bake them about 30 mins or until the tart has turned a bit golden.

tart nenas, pineapple tart
Happy Baking! Enjoy.


Wednesday, September 9, 2009

OnineOnineOnine:) & my fresh garden Pizza

o9o9o9 - a date that most think as lucky and for some, because of how it sounds in a certain language, means otherwise. To me, below is what is interesting about this number 9.
"In base 10 a number is evenly divisible by nine if and only if its digital root is 9. That is, if you multiply nine by any natural number, and repeatedly add the digits of the answer until it is just one digit, you will end up with nine" - wikipedia
I am not going to talk about numbers in this entry but just sharing a little knowledge I got from the web.

I will be talking about my summer obsession with my little garden. Little pots of flowers, herbs, peppers, tomatoes and zucchini.

veges in my balcony
produce harvestedRecently, I had harvested and made my very own garden produced vegetables into a quick pizza using pita bread that I bought fresh from a Mediterranean Market nearby, also topped with Spanish cheese. I have always wanted to try Spanish cheese when Rachel Ray used it in her sandwiches one time.

Firstly, I had sauteed onion, bought; bell pepper from my garden and sliced thinly beef in a pan for my meat portion of the pizza, then I sliced the cheese thinly, arranged so it almost covered the pita, topped with sliced tomatoes and zucchini from my garden. Since i did not have any basil, I chopped some cilantro then top it off with the sauteed beef. Everything were just eye-balled into each piece of pita that I have. Drizzle, extra virgin olive oil on top of the pita and put them in a 35o deg F oven for about 20 minutes or till the cheese melts.

beef pizza
Thinly crusted beef pizza. No sauce, just sliced cheese, tomato and zucchini and cilantro with a drizzle of extra Virgin Olive Oil. Voila!

Saturday, May 16, 2009

My very own first recipe: Coconut Tea Cake

I missed my Mom and her delicious Coconut Cake that she bakes in one of her Brass Dutch Oven. ~ ooh, the crust!!! I don't have a dutch oven but I do have a regular one as in many households nowadays. My cake version was not even close to my Mom's whose cake is so authentically classic. Shredded Coconut with lots of Eggs, sugar, butter and flour but, at least the flavor is there. I was thinking, a Light cake for tea.

This cake was first made on a recent Mother's Day, created for a very good friend, Naomi on her 1st Mother's Day. I was out of the regular ingredient for my favorite French-Style Lemon Yogurt Cake and since I am making her a Malaysian Home cooked lunch, I thought its time to brave myself in a new cake creation based on that Yogurt Cake recipe. I always have coconut milk in my pantry anyways. So here goes:)!

Sharing with all the bakers out there who has been hit by the baking bug:)
Coconut Tea Cakelook at the close up shot, I can't resist but peel of that corner crusty top layer when the cake just got out of the oven. a habit of mine. oooh..:)

Coconut Tea cake - by yours Truly:) first made on May 10, 2009

Heat your oven to 325ºF

Ingredient A:
4 eggs
1 can coconut milk ( 400 gm/13.5oz)
2 cups sugar** ( see notes below)
1 cup* canola oil

Ingredient B:
3 cups* of flour
4 tsp of baking powder

( Time for all this prep is only about 15 mins)

Mix ingredient A well till nice and smooth but not over mixing. Then, add in Ingredient B. Pour in a greased and floured 8x8 pan.

Bake in 325ºF for about 1 hr or till skewer comes clean.

**NOTE: My sister, the first tester on the other side of the globe, said its a bit sweet with 2 cups of sugar, you may want to reduce it to 1 1/2 if you like:)

*Conversion:
1 all-purpose flour - Cup US = 125 gram - g
1 cup oil = 8 fluid ounces( fl oz)

Happy Baking, Bakers!:) these are really good with plain unsweetened hot tea or coffee.

Thursday, July 31, 2008

Turmeric Pepper Chicken Salad®

Turmeric Pepper Chicken Salad®

I have been eating good lately. I am gonna make some of my friends who read this drool:) you know who you are:) Its healthy, cheap and so yummy. I call it clean food. [ substitute any greens according to your region]

I miss my mom and her cooking especially fried fish marinated with turmeric and salt. I can eat a plate of just that.

Its cut chicken breast about half inch thick, marinated with turmeric powder, salt and fresh cracked pepper. Sometimes a squeeze of lemon juice. That's the short marinate. The long marinate, my fav chef, Alton Brown would soak chicken with salt water with a few peppercorn and overnight it in fridge. I love this technique. Your chicken is so moist and flavorful when you cook 'em. I would soak the whole chicken breast before cutting it.

Pan fry chicken with a bit of olive oil in pan . 5-7 minutes on each side or like I do, I would flip it if I see the one side all caramelized:).

Once cooked, I let those good eats rest a bit. That is if I can stand it. I'll have romaine and iceberg lettuce with chopped parsley. A mixture of the lettuce creates the crunch factor, then come the cut into cube chicken. Sprinkle with raisins. Yes, raisins. Anti-oxidant, sweet and scrumptious, a contrast in taste against the salty goodness, crunchy almost tasteless vege with aromatic parsley. No. I did not forget the dressings because I don't use dressings in this one. yeah..you may think, "R U nuts? Salad without dressings???" Trust me. Enjoy the taste of just the cold raw vege against warm or even cold chicken, with sweet raisin and aromatic herb, is enough to tease your taste buds:) let it dance, let it dance:) yummm. Well, if you still want dressings, squeeze some lemon and drizzle olive oil:) m-m-m-m-m:)

Try it, cooking is an art, not science;) Baking is. Just watch your salt:)